
Okta API service app setup should be automated
Creating a secure Okta API Services app should not mean sending a customer through a long checklist of copy, paste, grant, verify, and hope. A better setup flow is simple: the customer creates a temporary Okta API token, the integration configures the service app correctly, validates the result, then revokes that token and shows proof.
The manual flow is too easy to get wrong
A secure Okta connector needs more than a client ID. The customer has to create an API Services app, use public key authentication, point Okta at the integration's JWKS URL, require DPoP, assign the right service-app role, grant the exact scopes, test the token exchange, and then confirm the application is hidden from end-user dashboards. Every one of those steps is reasonable. The problem is making a customer do them by hand, across several screens, with no machine-readable proof at the end.
That is where setup drift starts. One customer leaves DPoP off. Another grants extra scopes. Another uses a client secret because it is familiar. Another copies the wrong key URL. The result is an integration that may work, but is not configured the way the vendor, the customer, or the auditor thinks it is configured.
What a better setup should do
The integration should take a temporary Okta API token from a Super Admin and use it only for setup. The token should never become the long-term connector credential. It should not be saved as a secret. If an implementation writes a runtime copy while it is executing, that temporary copy should be deleted before the workflow returns.
The permanent connector should be an Okta API Services app using OAuth service-app access, private_key_jwt, a vendor-hosted JWKS URL, DPoP-bound token requests, and a precise set of approved scopes. Okta documents the service-app model in its guide to implementing OAuth for Okta with a service app. Okta also documents the underlying Applications API, Application Grants API, and API Tokens API. The building blocks are already there.
The flow we want customers to experience
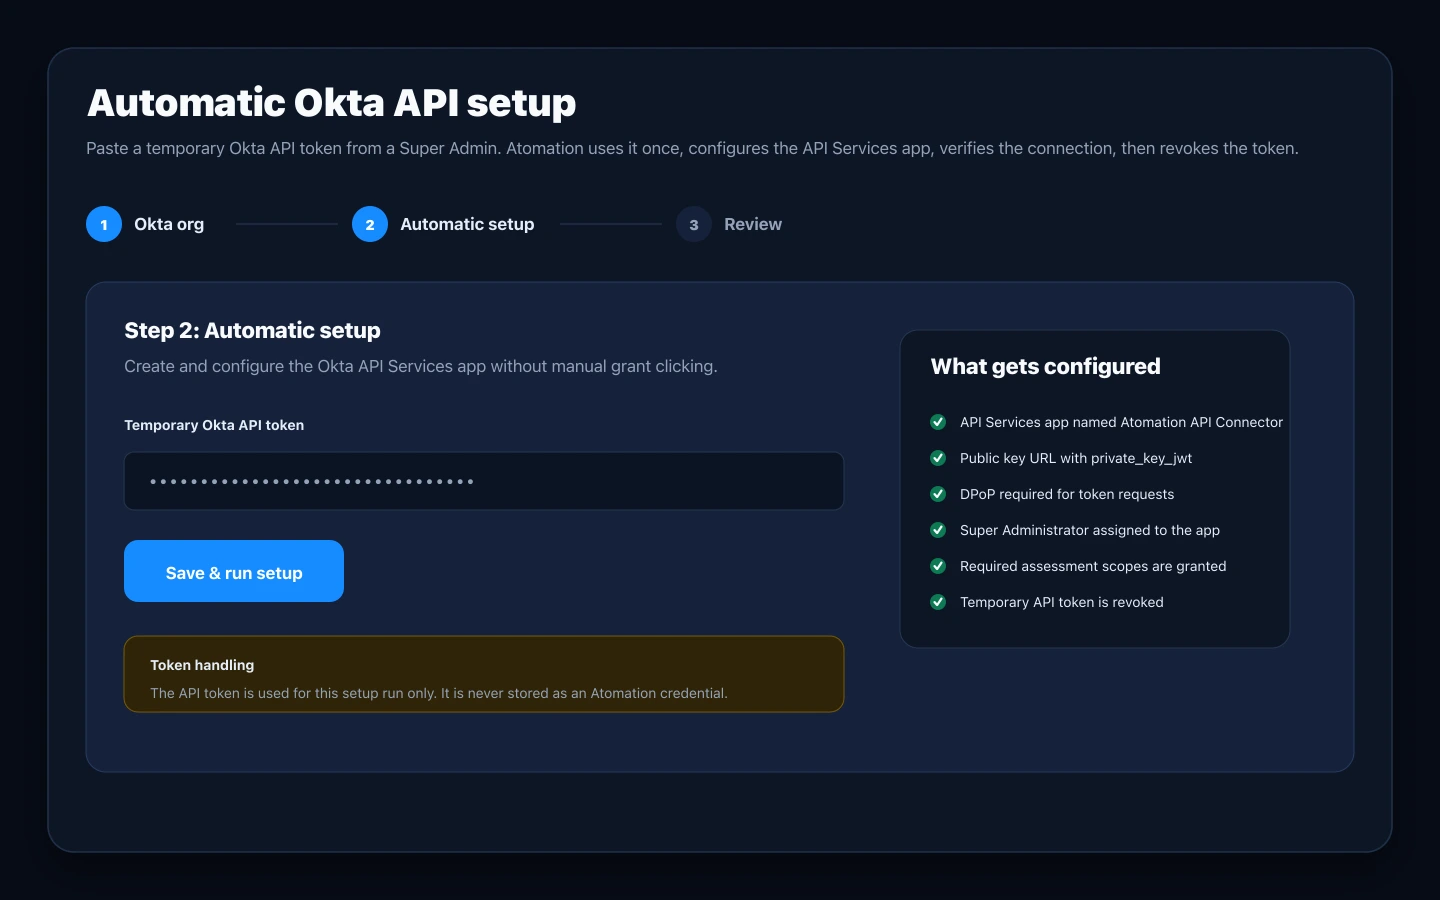
In Atomation, the setup screen asks for the Okta org URL first, then asks for a temporary Okta API token. The button says Save & run setup because that is what it does: it saves the org context and runs the setup job. The customer waits while the system creates the app, applies the configuration, verifies it, and revokes the token.
- Read the target Okta org URL and confirm it is an Okta Identity Engine org.
- Create an API Services app with a clear name, usually
Atomation API Connector. - Set the app to use
private_key_jwtand the workspace JWKS URL. - Require DPoP for token requests.
- Assign the required service-app admin role for the APIs being called.
- Grant the required assessment scopes and the approved maintenance scope.
- Exchange a token using the configured app and verify the required read access.
- Persist only the OAuth service-app connector details, not the temporary API token.
- Revoke the temporary Okta API token and show the customer the result.
Make the setup manifest-driven
A setup flow like this should be driven by a small manifest, not a human checklist. The exact schema can vary by product, but the core idea is stable: define the app label, JWKS URL, authentication method, token-binding requirement, allowed scopes, and post-run cleanup behavior in one place.
okta_api_connector:
  app_label: "Atomation API Connector"
  client_auth: "private_key_jwt"
  jwks_uri: "https://<workspace>.atomation.io/api/atomation/workspaces/<id>/jwks"
  require_dpop: true
  hide_from_end_user_dashboard: true
  scopes:
    assessment:
      - okta.users.read
      - okta.groups.read
      - okta.apps.read
    maintenance:
      - okta.appGrants.manage
  temporary_api_token:
    store: false
    revoke_after_setup: true
    show_revocation_proof: true
That last maintenance scope is not used to manage the customer's users, groups, policies, apps, or settings. It exists so the connector can keep its own approved grant list current as Okta adds new read scopes and the product adds new assessment capabilities. The runtime behavior should still be simple to explain: after the setup run creates and validates the connector, the assessment uses it to read data and does not modify the customer's users, groups, policies, apps, or settings.
The API call shape
The implementation should hide the low-level work from the customer, but the logic should be auditable. At a high level, the setup run follows this sequence:
POST /api/v1/apps
  create API Services app
  set private_key_jwt, JWKS URL, DPoP, hidden visibility

POST /oauth2/v1/clients/{clientId}/roles
  assign the service-app admin role required for Okta API access

POST /api/v1/apps/{appId}/grants
  grant each approved Okta API scope

POST /oauth2/v1/token
  verify private_key_jwt + DPoP token exchange

GET /api/v1/... read probes
  prove the app can read the required assessment data

DELETE /api/v1/api-tokens/current
  revoke the temporary Okta API token used for setup
The important part is not the exact route names in a blog post. The important part is the contract: create, configure, verify, persist the service-app connector, revoke the temporary API token, then show the customer what happened.
The customer should see proof, not just success
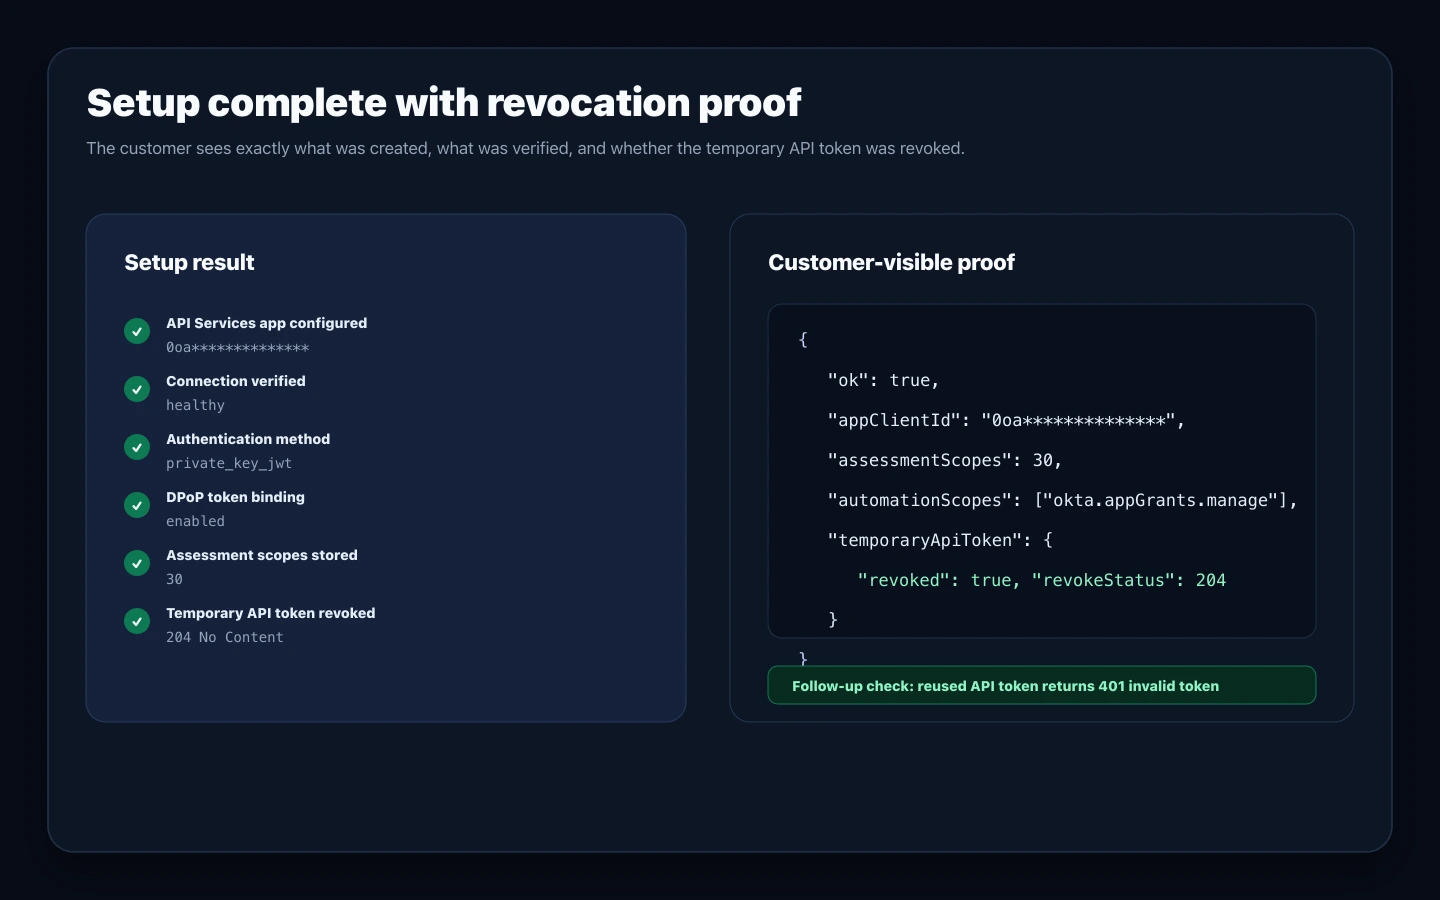
A successful setup should return a short, copyable result. At minimum, it should show the created app client ID, connector status, authentication method, DPoP state, stored assessment-scope count, automation-scope count, and temporary-token revocation status. If the customer wants to validate in Okta, the result should also tell them what to check in System Log.
{
  "ok": true,
  "appClientId": "0oa**************",
  "status": "healthy",
  "authMethod": "private_key_jwt",
  "dpop": true,
  "assessmentScopes": 30,
  "automationScopes": ["okta.appGrants.manage"],
  "temporaryApiToken": {
    "revoked": true,
    "revokeStatus": 204
  }
}
That is the difference between a wizard and an accountable workflow. A wizard says "done." A workflow says what it created, what it granted, what it verified, and what it revoked.
This would make sense for OIN too
The same pattern would make sense for vendor integrations generally, including OIN setup paths. Instead of asking a customer to click through several screens, the customer could approve a temporary Okta API token for setup, the integration could configure the app from a signed manifest, and the run could end by revoking that token and returning proof. The customer still controls the approval. The vendor still has to declare the app shape and scopes. Okta still records the events. The difference is that the final state is machine-checked instead of manually assembled.
Why this matters
API integrations are now part of the identity control plane. If setup is manual, drift is guaranteed. If setup is automated and verifiable, the customer gets a cleaner result: no stored setup token, no shared client secret, DPoP enabled, scopes applied from an approved manifest, and a clear revocation proof at the end.
Atomation is building the connector setup this way because it is how identity integrations should work. Explore the live demo at demo.atomation.io.